 JavaScript Editor
JavaScript Debugger
JavaScript Editor
JavaScript Debugger|
| ||
We'll also take a look at general Visual Basic file handling in this chapter. In Visual Basic .NET, file handling is largely based on the System.IO namespace, which encloses a class library that supports string, character, and file manipulation. These classes include properties, methods, and events for creating, copying, moving, and deleting files. The most commonly used classes are FileStream, BinaryReader, BinaryWriter, StreamReader, and StreamWriter, and we'll take a look at all of these classes in this chapter.
| Tip |
File handling is one of the most error-prone of all possible programming operations. It's best to always enclose your code in Try/Catch blocks here to handle problems (although I'll sometimes skip implementing that in this chapter in the interest of brevity). |
The FileStream class gives you access to files. You start working with a file on disk by opening it or creating it; you can use the members of the FileAccess, FileMode, and FileShare enumerations with the constructors of the FileStream class to determine how the file is created, opened, and shared. In addition, the FileStream class can open a file in one of two modes, either synchronously or asynchronously, which can have significant performance differences in different circumstances. FileStream defaults to opening files synchronously, but also has a constructor to open files asynchronously.
After you've opened or created a file, you can pass its FileStream object to the BinaryReader, BinaryWriter, StreamReader, and StreamWriter classes to actually work with the data in the file.
You also can use the FileStream Seek method to move to various locations in a file—this is called moving the read/write position or the read/write pointer. This allows you to break a file up into records, each of the same length. For example, if you're keeping track of 2,000 employees, you can create 2,000 records in a file, each with data on the corresponding employee.
Because you know the length of each record, it's easy to move to the beginning of a specific record and read it in—or overwrite it with new data. This record-based process, where you can move around in a file and select the data you want, is called random access. The other form of file access, where you just read or write data to a file one item after the other—and so you must read through the first 2001 data items if you want to read the 2002th—is called sequential access. The only difference between these types of access from our point of view is that for random access, you use the Seek method. You use the Seek method by specifying a byte offset to move by; you can specify if you want to move that number of bytes from the beginning of the file, the current position, or the end of the file, as we'll see in this chapter.
| Note |
One problem with storing data in records in Visual Basic .NET is the lack of a fixed-length string type. Because all records must be of the same length to let you use Seek easily, every string you store in a record has to be of a fixed length, so the record length matches the length of other records. In VB6 and before, you could create fixed-length strings, but not any more—now it's up to you to make sure that that the strings are of a certain fixed length (Visual Basic no longer has a fixed length string type built in), which you can do by padding them with spaces if necessary. |
As mentioned, after you've connected a FileStream object to a file, you can use the FileStream, BinaryReader, BinaryWriter, StreamReader, and StreamWriter classes with that file, and I'll take a look at those classes next.
To work with text data in files—that is, storing and reading text to and from files—you can use the StreamReader and StreamWriter classes. (The StreamReader class is actually derived from an abstract class called TextReader, which reads characters from a stream, and the StreamWriter class is derived from an abstract class called TextWriter, which writes characters to a stream.) We'll create an example that uses these classes named StreamWriterReader; this example will write text to a file, file.txt, and then read that text back, displaying it in a text box. I start by importing the System.IO namespace, and by creating file.txt and connecting a FileStream object to it. Next, I can create a StreamWriter object and use various methods to move around in and write text to the file.
In this case, I'll use the Seek method that we've already seen to move to the beginning of the file (that's not necessary in newly created or opened files because when you open a file, you start at the beginning of the file—here, I'm just showing how Seek works), then write a line of text to the file with the WriteLine method, and then write some text to the file with the Write method (the WriteLine method is the same as Write, except it adds a carriage-return/linefeed pair at the end of the text it writes).
I'll also use the Flush method—because file handling is buffered in Visual Basic, nothing is written to disk until the buffer is flushed. This happens automatically when the buffer is full or when you close a file (or when the associated stream object goes out of scope), but you also can use the Flush method to explicitly flush data to the disk. (You don't have to use Flush at all, because flushing is usually automatic; I'm just using it here to show that this method is available.) Finally, I close the file with the Close method; this closes the file on disk, which finishes our work with the file and makes it available to other programs:
Imports System
Imports System.IO

Public Class Form1
    Inherits System.Windows.Forms.Form

    'Windows Form Designer generated code

    Private Sub Button1_Click(ByVal sender As System.Object, _
        ByVal e As System.EventArgs) Handles Button1.Click
        Dim fs As New System.IO.FileStream("file.txt", FileMode.Create, _
            FileAccess.Write)

        Dim w As New StreamWriter(fs)
        w.BaseStream.Seek(0, SeekOrigin.End)
        w.WriteLine("Here is the file's text.")
        w.Write("Here is more file text." & ControlChars.CrLf)
        w.WriteLine("And that's about it.")
        w.Flush()
        w.Close()
        ⋮
Now that the file, file.txt, has been created and had some text placed in it, I can open it again with another FileStream object, then connect a StreamReader object to it, and use the StreamReader object's methods like ReadLine to read data from the file line by line (in text files, "lines" mean text strings of various lengths, marked by a carriage-return/linefeed pair at the end of each). How can you determine if there's still more data to read in the file? You can use the StreamReader object's Peek method, which tells you how much more data there is remaining in the file. If there's no more data, Peek returns a value of -1. If there is more data, I'll keep reading it in and displaying it in a multi-line text box, like this:
Imports System
Imports System.IO

Public Class Form1
    Inherits System.Windows.Forms.Form

    'Windows Form Designer generated code

    Private Sub Button1_Click(ByVal sender As System.Object, _
        ByVal e As System.EventArgs) Handles Button1.Click
        Dim fs As New System.IO.FileStream("file.txt", FileMode.Create, _
            FileAccess.Write)

        Dim w As New StreamWriter(fs)
        w.BaseStream.Seek(0, SeekOrigin.End)
        w.WriteLine("Here is the file's text.")
        w.Write("Here is more file text." & ControlChars.CrLf)
        w.WriteLine("And that's about it.")
        w.Flush()
        w.Close()

        fs = New System.IO.FileStream("file.txt", FileMode.Open, _
            FileAccess.Read)

        Dim r As New StreamReader(fs)
        r.BaseStream.Seek(0, SeekOrigin.Begin)
        While r.Peek() > -1
            TextBox1.Text &= r.ReadLine() & ControlChars.CrLf
        End While
        r.Close()
    End Sub
End Class
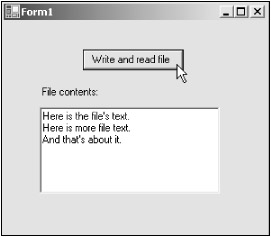
Note in particular the Seek statement. You pass this method the number of bytes to move from the current position (this value can be positive or negative), and the origin that you want to move from; and you define the origin with a value from the SeekOrigin enumeration: SeekOrigin.Begin for the beginning of the file, SeekOrigin.Current for the current location in the file, or SeekOrigin.End for the end of the file. You can see the results of this code in Figure 13.3, where I've created a new file, file.txt, filled it with text, and read that text back in.
So far, we've handled a text file—but what about binary files such as image files? And what's the difference, anyway? Shouldn't a text file be a binary file as well? It is. The difference is in the way that line endings are handled. In Windows, the end of a line is represented by two characters, a carriage return and a linefeed; if you only have a carriage return in your text, it'll be converted into a carriage return/ linefeed pair when you write your data to disk as a text file. If you write that text to disk as a binary file, you'll get an exact copy of your data on disk—and the carriage return will not be turned into a carriage return/linefeed pair. Because line endings are so important when you're handling data as text, the text-handling StreamReader and StreamWriter classes are line oriented, using methods such as WriteLine and ReadLine. But you also can handle data without organizing it into lines; you do that with the BinaryReader and BinaryWriter classes.
| Tip |
Both the StreamReader and StreamWriter classes use Unicode UTF-8 encoding by default. You can set the encoding for StreamWriter with the encoding parameter in its constructor. |
Both BinaryReader and BinaryWriter read and write data as binary (that is, in the raw 0s and 1s that your data is actually stored as in your computer) rather than text. (To handle text, you use StreamReader and StreamWriter instead.) For example, you use the BinaryWriter class's Write method to send binary data to a file. To read it back in, you can use the BinaryReader class's Read method, passing it an array of bytes to store data in, the location in the array to start string data, and the number of bytes you want to read, like this, where I'm reading 1,000 bytes from data.dat:
Dim fs As FileStream = New FileStream("data.dat", FileMode.Open)
Dim myBinaryReader As BinaryReader = New BinaryReader(fs)
Dim buffer(1000) As Byte
myBinaryReader.Read(buffer, 0, 1000)
However, there are more convenient methods available—for example, if you know you're reading in an Int32 value, you can use the BinaryReader class's ReadInt32 method, for Double values, you can use ReadDouble, for Boolean values, ReadBoolean, and so on. As another example, here's how I write 20 Int32 values to a file, data.dat, and then read them back in and display them in a text box in the example BinaryWriterReader on the CD-ROM—note that after I write the data to the file, all I have to do is to use Seek to move to the beginning of the file and read the data we just wrote:
Imports System.IO

Public Class Form1
    Inherits System.Windows.Forms.Form

    'Windows Form Designer generated code

    Private Sub Button1_Click(ByVal sender As System.Object, _
        ByVal e As System.EventArgs) Handles Button1.Click
        Dim fs As FileStream = New FileStream("data.dat", _
            FileMode.OpenOrCreate)
        Dim w As BinaryWriter = New BinaryWriter(fs)
        Dim LoopIndex As Int32

        For LoopIndex = 0 To 19
            w.Write(LoopIndex)
        Next

        w.Seek(0, SeekOrigin.Begin)
        Dim r As BinaryReader = New BinaryReader(fs)

        For LoopIndex = 0 To 19
            TextBox1.Text &= r.ReadInt32() & ControlChars.CrLf
        Next
    End Sub
End Class
Why are there multiple reading methods when you can write your data simply with Write? The Write method is actually overloaded for the various data types, and Visual Basic knows what kind of data type a variable is, so it can write it to the file without problem. But when you open a binary file, it's just a file full of binary bits, 1s and 0s, and Visual Basic has no clue how to divide it into items of a particular data type—which is why the ReadInt16, ReadChar, ReadBoolean, and so on methods exist.
Two other classes you should know about are File and Directory. The File class lets you handle files without opening them, allowing you to move and copy them, and so on. The Directory class lets you work with directories, renaming and creating them. In fact, the methods that let you do this are class methods, so you don't have to create any File and Directory objects first.
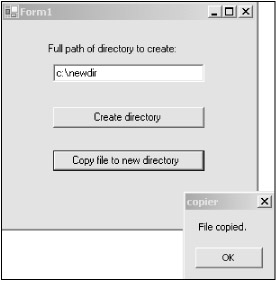
The copier example on the CD-ROM shows how this works. This example first lets you create a directory and then copy a file to it, using File and Directory methods. First, the user enters the path of a new directory into the text box in this example, and clicks the "Create directory" button, which uses the Directory class's CreateDirectory method to create the directory:
Imports System.IO

Public Class Form1
    Inherits System.Windows.Forms.Form

    'Windows Form Designer generated code

    Private Sub Button1_Click(ByVal sender As System.Object, _
        ByVal e As System.EventArgs) Handles Button1.Click
        Try
            Directory.CreateDirectory(TextBox1.Text)
        Catch
            MsgBox("Could not create directory.")
            Exit Sub
    End Try
    MsgBox("Directory created.")
End Sub
    ⋮
Next, I'll let the user use a Open File dialog to select a file to copy to the new directory, using the File class's Copy method, like this (note that I'm stripping the pathname off the filename returned by the Open File dialog using the String class's SubString method):
Imports System.IO

Public Class Form1
    Inherits System.Windows.Forms.Form

    'Windows Form Designer generated code

    Private Sub Button1_Click(ByVal sender As System.Object, _
        ByVal e As System.EventArgs) Handles Button1.Click
        Try
            Directory.CreateDirectory(TextBox1.Text)
        Catch
            MsgBox("Could not create directory.")
            Exit Sub
        End Try
        MsgBox("Directory created.")
    End Sub

    Private Sub Button2_Click(ByVal sender As System.Object, _
        ByVal e As System.EventArgs) Handles Button2.Click
        Try
            If OpenFileDialog1.ShowDialog <> DialogResult.Cancel Then
                File.Copy(OpenFileDialog1.FileName, TextBox1.Text & "\" & _
                    OpenFileDialog1.FileName.Substring(_
                    OpenFileDialog1.FileName.LastIndexOf("\")))
            End If
        Catch
            MsgBox("Could not copy file.")
            Exit Sub
        End Try
        MsgBox("File copied.")
    End Sub
End Class
You can see the results in Figure 13.4, where I've created a new directory and have copied a file to it.
And that's it—now it's time to turn to the Immediate Solutions section to get to the various details of these topics.
|
| ||
Free JavaScript Editor
JavaScript Editor