 JavaScript Editor
JavaScript Debugger
JavaScript Editor
JavaScript Debugger|
| ||
To create a notify icon component, you need an icon file to assign to this control's Icon property. You can create new icons with an icon designer. I'll do that here as part of the NotifyIcons project on the CD-ROM.
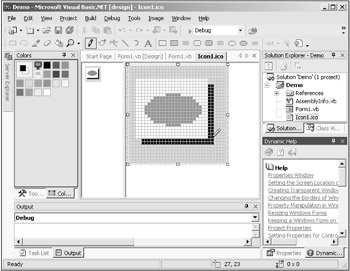
To open an icon designer, just select Project|Add New Item to open the Add New Item dialog, then select Icon File in the Templates box and click Open. This will create a new icon and open it for design in an icon designer, as you see in Figure 8.17.
To design your icon, you can use the tools you see in the toolbar immediately above the icon. I've drawn a rudimentary icon here, and saved it as icon1.ico in the NotifyIcons folder.
| Tip |
Many, many icons ready for you to use come with Visual Basic-take a look at the Common7\graphics\icons directory. |
The next step is to add a NotifyIcon component to the form in this project. When you do, this component will appear in the component tray beneath the form, because this is a component, not a control. Set the Icon property of this component to icon1.ico. In addition, the text you place in the notify icon'sText property becomes the tool tip text for the icon in the system tray.
By default, the notify icon's Visible property is set to True, but in this case, I'll set it to False and let the user display the icon with a button:
Private Sub Button1_Click(ByVal sender As System.Object, _
    ByVal e As System.EventArgs) Handles Button1.Click
    NotifyIcon1.Visible = False
End Sub
And that's all it takes-now when the user clicks this button, the notify icon appears in the system tray, as you see in Figure 8.5. You also can handle events for the notify icon, as we'll see in the next topic.
|
| ||
Free JavaScript Editor
JavaScript Editor