 JavaScript Editor
JavaScript Debugger
JavaScript Editor
JavaScript Debugger|
| ||
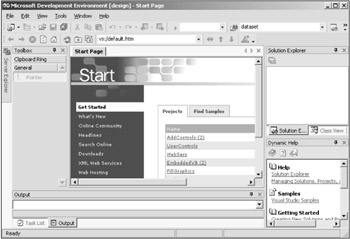
Start Visual Basic now. You'll see the Visual Basic Integrated Development Environment appear, as in Figure 1.1. I'm not going to go into the details here, because we'll cover them later in this chapter—right now, let's just have a little fun.
Generally speaking, there are three types of applications in Visual Basic—those based on Windows forms (such applications are usually local to your machine), Web forms (that come to you across the Internet), and console applications (that run in a DOS window). I'll take a look at Windows forms here first, as those will be the most familiar to Visual Basic 6.0 programmers.
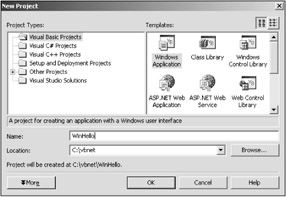
To create an application based on Windows forms, select the New item in the File menu, then select the Project item in the submenu that appears. This brings up the New Project dialog box you see in Figure 1.2.
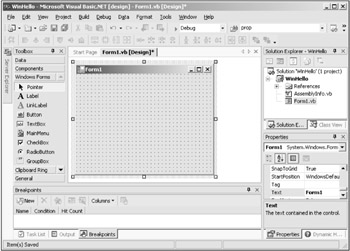
Select the folder labeled Visual Basic Projects in the Project Types box, as shown in Figure 1.2, and select the Windows Application project type in the Templates box. You also can name the new project—I'll name it WinHello—and specify where to store it—I'll store it in the c:\vbnet folder, as you see in Figure 1.2. Now click the OK button to create this new Visual Basic project. Visual Basic creates a new Windows project and gives you the result you see in Figure 1.3.
The window you see at the center of Figure 1.3, labeled Form1, is the window that will become our new Windows application; in Visual Basic, as you most likely know, these windows are called forms. The genius of Visual Basic has always been that it's visual, of course, which means that you can design your applications visually. In this case, I'll just add two Windows controls to this form—a text box and a button. When you click the button, the application will display the text "Hello from Visual Basic" in the text box.
Controls, of course, are user-interface elements that you see in Windows all the time, such as list boxes, scroll bars, button, menus, and so on. To add a text box to Form1, first make sure that the Visual Basic toolbox is open. You can see the toolbox to the left of Form1 in Figure 1.3; if you don't see the toolbox, select the View|Toolbox menu item to display it. Now click the Windows Forms item in the toolbox so the toolbox displays the possible controls you can use in Windows forms, such as text boxes, buttons, labels, link labels, and so on.
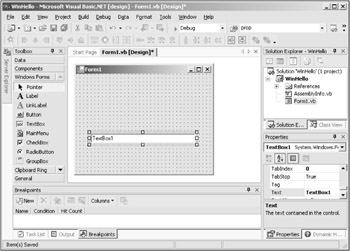
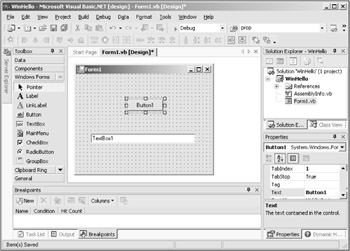
In a move that's very familiar to Visual Basic programmers, you can now simply drag a text box from the toolbox to Form1, or just double-click the TextBox entry in the toolbox. This adds a text box to Form1; position and stretch it with the mouse until it appears roughly as you see in Figure 1.4. (The boxes you see around the text box are sizing handles, and if you've used Visual Basic at all, you know you can use them to change the shape of the text box.)
Next, add a button to Form1 in the same manner, as illustrated in Figure 1.5. Visual Basic 6.0 programmers can already see many differences here—including the fact that the button is labeled Button1, not Command1, and the text box is labeled TextBox1, not Text1.
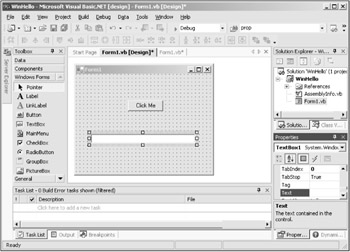
These are the controls that will appear in our application. The next step is to customize them; in this case, start by changing the caption of the button from "Button1" to "Click Me." To do that, click the button in Form1 to select it so the fuzzy outline you see in Figure 1.5 appears around it. Next, move to the Properties window at the lower right of the IDE; this lists the properties of the currently selected control or object (if you can't see the Properties window, select the View|Properties Window menu item). Click the Text property (no longer the Caption property of Visual Basic 6.0) in the Properties window, and change the text of the button from "Button1" to "Click Me," as you see in Figure 1.6. You set properties of objects such as this button to customize them, and we'll be doing so throughout the book. The Properties window lists properties like the Text property on the left and their values on the right; to change a property's value, you only have to edit its setting and press Enter.
In the same way, erase the text in the text box by using its Text property in the Properties window, giving you the result you see in Figure 1.7, where the text in both controls is as we want it.
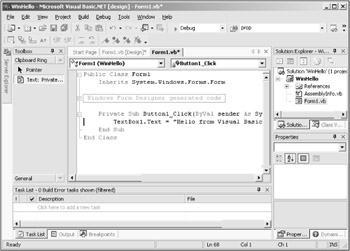
Visual Basic has done a lot of programming for us to get us to this point, but it can't do everything; in particular, it's up to us to add some code to place the message "Hello from Visual Basic" in the text box when the user clicks the button. To associate code with the button, you just double-click the button, as you would in Visual Basic 6.0, opening the corresponding code, as you see in Figure 1.8.
Find the part of the code that handles clicks of the button, which looks like this (this will also look different to Visual Basic 6.0 programmers):
Private Sub Button1_Click(ByVal sender As System.Object, ByVal e As _
    System.EventArgs) Handles Button1.Click

End Sub
To place the text we want in the text box when the user clicks the button, type this code directly into the code window, as you see in Figure 1.8; this sets the Text property of our text box, TextBox1, to "Hello from Visual Basic":
Private Sub Button1_Click(ByVal sender As System.Object, ByVal e As _
    System.EventArgs) Handles Button1.Click
    TextBox1.Text = "Hello from Visual Basic"
End Sub
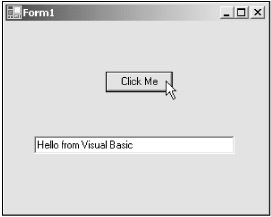
And that's all it takes—now run the program by selecting the Debug|Start menu item, or by pressing F5. The application starts, as you see in Figure 1.9, and when you click the Click Me button, the message "Hello from Visual Basic" appears in the text box, as Figure 1.9 also shows. That's it—our first program is a success. To close the application, click the X button at upper right, as you would with any Windows application.
This is the magic of Visual Basic—with one line of code, we've created a functioning application. In the early days of Windows, it would have taken a minimum of five pages of dense C or C++ code to have done the same thing. That's our first Visual Basic application, already up and running. Make sure you save the WinHello application (Visual Basic will save all files when it runs an application, but you also can use the File|Save All menu item) before moving on.
| Tip |
As Visual Basic programmers know, Visual Basic has a handy way of letting you know when a file has been changed and has not yet been saved—an asterisk (*) will appear after the name of the file. If you look in the IDE's title bar and in the tabs above the code window in Figure 1.8, you can see this asterisk for the file Form1.vb, which is where the code for Form1 is stored, because we've modified that file without saving it yet. |
In fact, all this is pretty familiar to Visual Basic 6.0 programmers—so let's do something that's new: create a Web application. This application will do the same as the Windows application we've just seen, but it'll run on a Web server and appear in a browser.
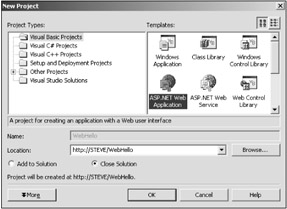
To create a new Web application in Visual Basic, you select the File|New|Project menu item opening the New Project dialog box as before. Select the Visual Basic Projects folder in the Project Types box, also as before, but this time, select ASP.NET Web Application in the Templates box.
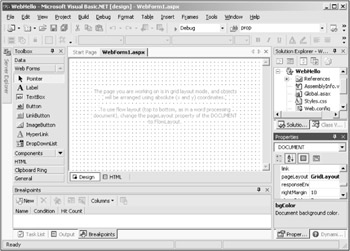
Give this new application the name WebHello, as you see in Figure 1.10—and now comes the tricky part. To create a Web application, you need a Web server that uses the Microsoft Internet Information Server (IIS) version 5.0 or later (with FrontPage extensions installed), and that server must be running. You can enter the location of your server in the Location box in the New Projects dialog box; if you have IIS running on your local machine, Visual Basic will find it and use that server by default, as you see in Figure 1.10, where Visual Basic has selected http://STEVE, my local IIS server (IIS comes with operating systems like Windows 2000 Server; it also comes with Windows 2000 Professional, although you have to install it from the Windows 2000 CDs). When you click the OK button, Visual Basic will create the new Web application, as you see in Figure 1.11.
As you also can see in Figure 1.11, designing Web applications looks much like designing Windows applications. You can see a note in the Web form under design—called a page—at the center of the IDE that says that we're using the Grid layout mode. In this mode, controls will stay where you position them, just as they did when we created our Windows application. The other layout mode is the Flow layout mode; in this mode, the controls in your application will move around, as they would in a standard Web page, depending on where the browser wants to put them. (If your Web application happens to start in Flow layout mode, click the Web form itself, then set the pageLayout property in the Pproperties window at lower right to GridLayout—if you've used Visual Basic before, you're already familiar with the properties window; it's also covered in detail later in this chapter.)
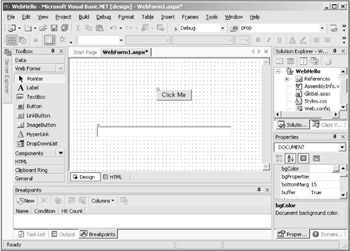
Now we can design our new Web application just as we did the Windows application—click the Web forms item in the toolbox, and add both a text box and a button to the Web form, as you see in Figure 1.12.
And, as before, we can double-click the button to open its associated code, as you see in Figure 1.13.
We can add the same code to handle the button click as before; find this code in the code window:
Private Sub Button1_Click(ByVal sender As System.Object, ByVal e As _
    System.EventArgs) Handles Button1.Click

End Sub
and add this code:
Private Sub Button1_Click(ByVal sender As System.Object, ByVal e As _
    System.EventArgs) Handles Button1.Click
    TextBox1.Text = "Hello from Visual Basic"
End Sub
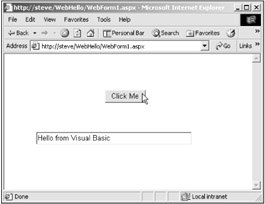
That's all it takes—now run the application by selecting the Debug|Start menu item, or pressing F5. The application comes up in your browser, as shown in Figure 1.14, and when you click the button, the message "Hello from Visual Basic" appears in the text box, just as it did in our Windows application.
That's our first Web application—to close the application, just close the browser window. As you can see, this Web application is remarkably similar to our Windows application, and that's the primary inspiration behind VB .NET—bringing Visual Basic to the Internet. Web applications such as this one use HTML to display their controls in a Web page, so there are more limitations on those controls than on Windows controls, but as you can see, the design process is very similar. Behind the scenes, Visual Basic .NET has been storing the application's files on the Web server automatically—no special uploading needed. Anyone with a browser can look at the application on the Internet, simply by navigating to its URL (in this case, that's http://steve/WebHello/WebForm1.aspx, as you see the browser's title bar in Figure 1.14). If you're like me, the first time you create and run a Web application, you'll feel a lot like saying Wow. Web applications like this will make Web development a great deal easier and more popular on IIS platforms.
There's another new type of Visual Basic application in VB .NET—console applications. These applications are command-line based and run in DOS windows. This gives one the feeling once again that VB .NET is following the lead of Java, because Java applications run in DOS windows in Windows (before this, Visual Basic itself hasn't interacted with DOS for years—not since the ancient and ill-fated VB DOS version). However, the change is a welcome one, because it provides us with an option for very simple programming, without worrying about user interface implementation and issues.
To see how console applications work, use the File|New|Project menu item to open the New Project menu item, and select Console Application in the Templates box, as shown in Figure 1.15. Name this new project ConsoleHello, as also shown in Figure 1.15. Then click OK to create the new project.
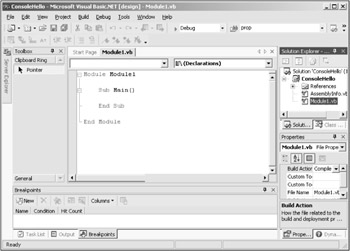
When you create this new project, you see the result in Figure 1.16; note that in this case, because there is no user interface, Visual Basic opens the project directly to a code window.
The code here looks like this:
Module Module1

    Sub Main()

    End Sub

End Module
Console applications are based on Visual Basic modules that are specifically designed to hold code that is not attached to any form or other such class. Notice also the Sub Main() procedure here. As we'll see in more depth in Chapter 3, a Sub procedure is a series of Visual Basic statements enclosed by the Sub and End Sub statements. When the console application is run, those statements are run automatically.
We can display our "Hello from Visual Basic" message in this console application using the WriteLine method, a prewritten procedure available to us in Visual Basic. This method is part of the System.Console class, which in turn is part of the System namespace. The System.Console class is part of the .NET framework class library, along with thousands of other classes. To organize all those classes, .NET uses namespaces. This gives classes their own space and stops conflicts between the various names in such classes; for example, if two classes defined a WriteLine method, you could keep them from conflicting by placing them in different namespaces so Visual Basic knows which one you mean. We'll become more familiar with namespaces starting in Chapter 2; for now, we can use WriteLine to display our message, like this:
Module Module1

    Sub Main()
        System.Console.WriteLine("Hello from Visual Basic")
    End Sub

End Module
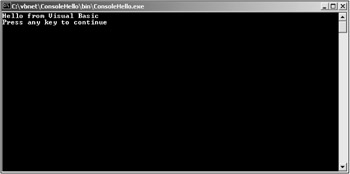
You can run this program now by selecting the Debug|Start menu item; when the program runs, it displays both our message and the prompt about the Enter key, like this:
You can see this result in Figure 1.17. There, the DOS window stays open until the user is ready to dismiss it by pressing the Enter key, or by clicking the X button at upper right in the DOS window.
Windows applications are already familiar to Visual Basic 6.0 programmers, but Web applications and console applications like the examples we've developed are new. In fact, there's a great deal that's new in VB .NET; I'll take a look at what's new in overview now.
|
| ||
Free JavaScript Editor
JavaScript Editor