 JavaScript Editor
JavaScript Debugger
JavaScript Editor
JavaScript Debugger|
| ||
One of the most important things to consider when designing your Web applications is your Web pages' appearance. You can customize their appearance in several ways. For instance, you can change the styles used in a Web application to display HTML elements in the Styles.css file. You can set the properties of a Web form in the Properties window, setting text color, background color, and so on. You also can edit the HTML in a Web form's ASPX file directly, and the Visual Basic IDE can operate as a great HTML editor for this purpose.
To edit HTML directly, click the HTML button at the bottom of the code designer for WebForm1.aspx in the First project we just created. When you click the Design button, you see what your HTML page will look like when it appears in a browser; when you click the HTML button, you see the actual HTML for the page (complete with ASP elements, of course). When you're looking at the HTML for the page, you can edit it just as you can edit Visual Basic code—and all the HTML syntax is already built into this editor.
For example, say that I wanted to display text in a centered <h1> header—the biggest HTML header there is—in a Web form. I can center the <h1> element with a <div> element, and when I type a <div> tag into the HTML, the HTML editor automatically adds a closing </div> tag. And when I add an align attribute, IntelliSense lists the possible values this attribute can take, as you see in Figure 14.9.
| Tip |
Why don't I use the more familiar <center>element to center this header? As of HTML 4.0, <center> is obsolete, and the Visual Basic HTML editor will mark it as a syntax error—the modern replacement is to use a <div> element with the align attribute set to "center". |
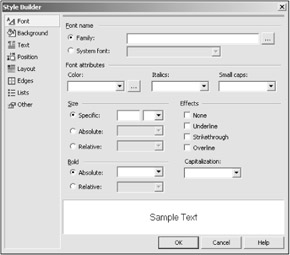
Next, I add the <h1> element inside the <div> element, just by typing it in. To set the style for this element, you can add a style attribute to the element by typing that in, which makes IntelliSense display a button with the text "Build Style", which, when you click it, brings up the Style Builder (as you can see in Figure 14.10), which you can use to build CSS styles for individual elements. This is very useful indeed, because you don't have to remember what styles apply to which elements.
| Tip |
If you ever want to paste HTML into the HTML editor, use the Edit|Paste as HTML menu item, not simply Edit|Paste. The Edit|Paste item will convert elements like <div>to "<div>", but the Edit|Paste as HTML item will paste the HTML intact. |
Using the HTML editor, then, I can add HTML to WebForm1.aspx to display the text "Web Forms" in an <h1> header like this:
<%@ Page Language="vb" AutoEventWireup="false"
Codebehind="WebForm1.aspx.vb" Inherits="First.WebForm1"%>
<!DOCTYPE HTML PUBLIC "-//W3C//DTD HTML 4.0 Transitional//EN">
<HTML>
  <HEAD>
    <title>First Web Application</title>
<meta content="Microsoft Visual Studio .NET 7.0" name=GENERATOR>
<meta content="Visual Basic 7.0" name=CODE_LANGUAGE>
<meta content=JavaScript name=vs_defaultClientScript>
<meta content=http://schemas.microsoft.com/intellisense/ie5
name=vs_targetSchema>
  </HEAD>
<body MS_POSITIONING="GridLayout">
<div align=center>
<h1 style ="FONT-SIZE: 36pt; FONT-FAMILY: 'Times New Roman'">Web Forms</h1>
</div>
<form id=Form1 method=post runat="server"><asp:button id=Button1
style="Z-INDEX: 101; LEFT: 108px; POSITION: absolute; TOP: 77px"
runat="server" Text="Button" Width="106px" Height="23px"></asp:button>
<asp:textbox id=TextBox2 style="Z-INDEX: 104; LEFT: 240px;
POSITION: absolute; TOP: 124px" runat="server" Width="205px"
Height="24px"></asp:textbox><asp:listbox id=ListBox1 style="Z-INDEX:
103; LEFT: 107px; POSITION: absolute; TOP: 125px" runat="server"
Width="107px" Height="71px" AutoPostBack="True">
        ⋮
You can see how this header will appear in the Web page immediately; just click the Design button to switch to design view, as you see in Figure 14.11. In this way, we've been able to directly edit the HTML of WebForm1.
Of course, you don't have to edit any HTML directly if you don't want to; you can design much of a Web page's appearance by setting properties for the Web form in the Properties window, and you can display headers like the one in this example using label controls. However, it's important to know that you can work with a Web form's HTML directly and customize what's going on—if you want to and know how to.
|
| ||
Free JavaScript Editor
JavaScript Editor