 JavaScript Editor
JavaScript Debugger
JavaScript Editor
JavaScript Debugger
To get a better understanding of how the Intel Peer-to-Peer Accelerator Kit works in a peer-to-peer application you might design, this chapter modifies the peer messaging application (first presented in Chapter 4) to use the toolkit. This gives the added benefit of firewall traversal and integrated security, but it also requires some unexpected code changes.
The next three sections present the basic changes that are required to the interfaces, server, and client. After reviewing these, you can continue with the last section to easily add enhanced security.
The first step is to redefine the interfaces used in the system. In a peer-to-peer application developed with the Intel toolkit, you don't use the ObjRef directly. Instead, when a peer wants to communicate with another peer, it constructs a new Peer URL and uses the System.Activator object to retrieve a proxy.
To support this approach, the signature of the ITalkServer.AddUser() method needs to be modified slightly so that it accepts a peer URL instead of a ITalkClient.
Public Interface ITalkServer
    ' These methods allow users to be registered and unregistered
    ' with the server.
    Sub AddUser(ByVal [alias] As String, ByVal peerUrl As String)
    Sub RemoveUser(ByVal [alias] As String)

    ' This returns a collection of currently logged-in user names.
    Function GetUsers() As ICollection

    ' The client calls this to send a message to the server.
    Sub SendMessage(ByVal senderAlias As String, _
      ByVal recipientAlias As String, ByVal message As String)

End Interface
This example is using the centralized version of the Talk .NET application. If it was the decentralized version, you would also need to modify the GetUser() method to return a peer URL instead of an ITalkClient reference.
Even though the Intel Peer-to-Peer Accelerator Kit includes a discovery service, a coordinator component is still required to help online peers discover one another for messaging purposes. Before modifying the TalkServer, you need to add a reference to the Intel.Peer.Messaging.dll assembly and import the following namespace:
Import Intel.Peer.Messaging
The first change is how the TalkServer coordinator object is registered. Instead of using the configuration file and the RemotingConfiguration.Configure() method, the registration must be performed programmatically (although you could store some of this information in application settings in a configuration file to allow easy modification).
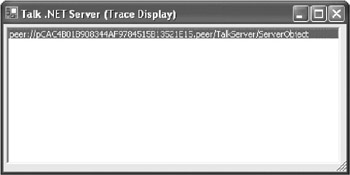
The registration consists of three steps: defining an application name, registering a new channel, and registering a new well-known Singleton object that clients can call. At the end of these steps, the server displays the URL of the Talk .NET server coordinator object in the trace display (see Figure 13-6).
' Set the application name. This information is used to create the complete URL.
RemotingConfiguration.ApplicationName = "TalkServer"

' Create and register the channel for peer-to-peer communication.
Dim Channel As New PeerChannel()
ChannelServices.RegisterChannel(Channel)

' Register the ServerProcess object as a Singleton so clients can call it.
Dim Uri As String = "ServerObject"
Dim ServiceEntry As New WellKnownServiceTypeEntry(GetType(ServerProcess), Uri, _
  WellKnownObjectMode.Singleton)
RemotingConfiguration.RegisterWellKnownServiceType(ServiceEntry)

' Retrieve the complete URL and display it.
Dim Url As String = PeerChannel.GetUrl(Uri)
Trace.WriteLine(Url)
The TalkServer requires very few additional changes. The new AddUser() method must be modified so that it stores a collection of Peer URLs instead of ITalkClient references:
Public Sub AddUser(ByVal [alias] As String, ByVal peerUrl As String) _
  Implements TalkComponent.ITalkServer.AddUser

    Trace.Write("Added user '" & [alias] & "'")
    SyncLock _ActiveUsers
        _ActiveUsers([alias]) = peerUrl
    End SyncLock

    MessageDelivery.UpdateUsers(_ActiveUsers.Clone())

End Sub
The message delivery code must also take this change into account. Before it can contact a peer, it must convert the URL into a proxy. Here's the abbreviated code from the MessageDelivery class:
' Deliver the message.
Dim Recipient As ITalkClient
Dim PeerUrl As String
Dim Sender, MessageBody As String

SyncLock RegisteredUsers
    If RegisteredUsers.ContainsKey(NextMessage.RecipientAlias) Then
        PeerUrl = RegisteredUsers(NextMessage.RecipientAlias)
        MessageBody = NextMessage.MessageBody
        Sender = NextMessage.SenderAlias

      Else
        ' User wasn't found. Try to find the sender.
        If RegisteredUsers.ContainsKey(NextMessage.SenderAlias) Then
            PeerUrl = RegisteredUsers(NextMessage.SenderAlias)
            MessageBody = "'" & NextMessage.MessageBody & _
              "' could not be delivered."
            Sender = "Talk .NET"
        Else
            ' Both sender and recipient weren't found.
            ' Ignore this message.
        End If
    End If
End SyncLock

If PeerUrl <> "" Then
    Recipient = CType(Activator.GetObject(GetType(ITalkClient), PeerUrl), _
      ITalkClient)
    Recipient.ReceiveMessage(MessageBody, Sender)
End If
Optionally, the server can also enable store-and-forward to ensure that message delivery is reattempted periodically if the peer cannot be contacted immediately. In order to support this feature, the server must be calling a method that's marked with the <OneWay> attribute, because there's no way for it to be sure that the method has actually executed. The ReceiveMessage() already uses this attribute. The only other step is to add the parameters to the peer URL that instructs the peer service to cache the message if needed. You do this by using the shared PeerChannel.EnableStoreAndForward() method and by specifying an absolute expiration date as a DateTime object or a number of seconds to live. The following example caches a message for up to 120 seconds.
If PeerUrl <> "" Then
    PeerUrl = PeerChannel.EnableStoreAndForward(PeerUrl, 120)
    Recipient = CType(Activator.GetObject(GetType(ITalkClient), PeerUrl), _
      ITalkClient)
    Recipient.ReceiveMessage(MessageBody, Sender)
End If
The peer clients can use the same approach to cache messages sent to the server (although this would be less useful) or to cache messages sent to other peers.
As with the TalkServer, you need to add a reference to the Intel.Peer.Messaging.dll assembly and import the Intel.Peer.Messaging namespace on the client. The client also needs to register its peer channel and the ClientProcess Singleton programmatically. The first step is to define the channel and a unique application name. In this case, the user alias is used as the application name. This allows you to run multiple clients on the same computer without creating a conflict.
RemotingConfiguration.ApplicationName = [Alias]
Dim Channel As New PeerChannel()
ChannelServices.RegisterChannel(Channel)
The next step is to register the remotable ClientProcess object so that the server can contact the peer:
Dim Uri As String = "TalkClient"
Dim ServiceEntry As New WellKnownServiceTypeEntry(GetType(ClientProcess), _
  Uri, WellKnownObjectMode.Singleton)
RemotingConfiguration.RegisterWellKnownServiceType(ServiceEntry)
Now the peer can create a proxy object for talking to the server using the server's URL. In this case, the URL is constructed by using the defined application and object name, along with the machine-specific peer identifier. Remember, to avoid hard-coding these values, you can read them from the application settings section in a configuration file.
Dim Peer As String = "pCAC4B01B908344AF9784515B13521E15.peer"
Dim App As String = "TalkServer"
Dim Obj As String = "ServerObject"
Dim Url As String = "peer://" & Peer & "/" & App & "/" & Obj

' Create the proxy.
Server = CType(Activator.GetObject(GetType(ITalkServer), Url), ITalkServer)
The final step is to register with the server using the local peer URL. All this code takes place in the ClientProcess.Login() method.
Dim PeerUrl As String = PeerChannel.GetUrl(Uri)
Server.AddUser(_Alias, PeerUrl)
In the original Talk .NET application, the client application registers the ClientProcess object and then creates a new ClientProcess instance to start sending messages to the server. When the server calls back to the client, no new object is created. Instead, the existing ClientProcess instance is used. However, with the Intel Peer-to-Peer Accelerator Kit, this behavior changes. If you use the exact same approach, you'll actually end up with two ClientProcess objects: the one you created manually and the one created by the Remoting infrastructure to handle the server callbacks. This creates a significant problem. Namely, the Talk form will no longer receive the ClientProcess.MessageReceived event, because it will occur in a different object than the one it's using.
The recommended way to solve this problem is to use some sort of shared location to store a callback. Emulating the design pattern used in Intel's own Messenger sample, you can make three changes:
Make all the members and methods of the ClientProcess class shared, except for the ITalkClient methods such as ReceiveMessage(). Change the other parts of the application so they use these shared methods and don't try to create a ClientProcess instance.
Use a callback instead of an event to contact the Talk form.
In the ReceiveMessage() method, check the shared callback delegate. If it's initialized, raise the callback.
Here's the abbreviated ClientProcess code:
Public Class ClientProcess
    Inherits MarshalByRefObject
    Implements ITalkClient

    ' This callback is used to transfer the message from the remotable
    ' ClientProcess object to the Talk form.
    Public Shared MessageReceivedCallback As ReceiveMessageCallback

    ' The reference to the server object.
    Private Shared Server As ITalkServer

    Private Shared _Alias As String
    Public Shared Property [Alias]() As String
        Get
            Return _Alias
        End Get
        Set(ByVal Value As String)
            _Alias = Value
        End Set
    End Property

    Public Shared Sub Login()
        ' (Code omitted.)
    End Sub

    Public Shared Sub LogOut()
        ' (Code omitted.)
    End Sub

    Public Shared Sub SendMessage(ByVal recipientAlias As String, _
      ByVal message As String)
        ' (Code omitted.)
    End Sub

    ' This is the only nonshared method.
    <System.Runtime.Remoting.Messaging.OneWay()> _
    Private Sub ReceiveMessage(ByVal message As String, _
      ByVal senderAlias As String) Implements ITalkClient.ReceiveMessage

        If Not ClientProcess.MessageReceivedCallback Is Nothing Then
            MessageReceivedCallback(message, senderAlias)
        End If

    End Sub

    Public Shared Function GetUsers() As ICollection
        Return Server.GetUsers
    End Function

End Class
With these changes, the Talk .NET application becomes fully functional. Another recommended change is to reduce the frequency that the client retrieves new users from the server by increasing the tmrRefreshUsers timer interval. This is useful because the communication latency is noticeably greater than it was with the pure Remoting solution.
In order to communicate using secure encryption, you simply need to instruct the peer service by adding the PeerSecure option to the end of the peer URL. This can be accomplished using the shared PeerChannel.MakeSecure() method.
Dim Peer As String = "pCAC4B01B908344AF9784515B13521E15.peer"
Dim App As String = "TalkServer"
Dim Obj As String = "ServerObject"
Dim Url As String = "peer://" & Peer & "/" & App & "/" & Obj

Url = PeerChannel.MakeSecure(Url)
Server = CType(Activator.GetObject(GetType(ITalkServer), Url), ITalkServer)
In addition, you can configure a service to require secure sessions and reject requests that don't use them. In this case, you use the shared PeerChannel .SecureWellKnownServiceType() method. This can be called for both the ClientProcess and the ServerProcess objects before they're registered with the Remoting infrastructure.
Dim Uri As String = "ServerObject"
Dim ServiceEntry As New WellKnownServiceTypeEntry(GetType(ServerProcess), _
  Uri, WellKnownObjectMode.Singleton)

PeerChannel.SecureWellKnownServiceType(ServiceEntry)
RemotingConfiguration.RegisterWellKnownServiceType(ServiceEntry)
| Tip |
You cannot use the store-and-forward capability in conjunction with secure messages. |
Unfortunately, life isn't nearly this simple. In order to create a secure SSL session, the peers must be able to authenticate one another using certificates. That means that you must create a certificate for every peer and store it in the local certificate store. You must also configure the trusted roots on both peers so that certificates signed by this peer are trusted implicitly. (A better and more secure alternative is to sign the peer certificates using a trusted third party, such as a local Windows server or certificate authority. However, the Intel Peer-to-Peer Accelerator Kit API doesn't support this functionality directly.)
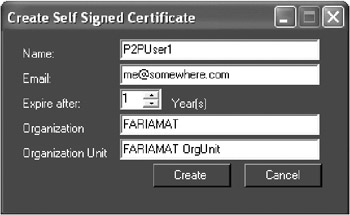
This process can be accomplished programmatically using the PeerCertificate Management class, which is demonstrated in the CertificateManagementUI sample application (see Figure 13-7). Essentially, this application calls the PeerCertificateManagement.CreateKeyAndSelfSignedCertificate() method to generate a new certificate (with a 512-bit RSA asymmetric key pair), sign it, and add it to the local personal certificate store.
Figure 13-8 shows the CertificateManagementUI utility.
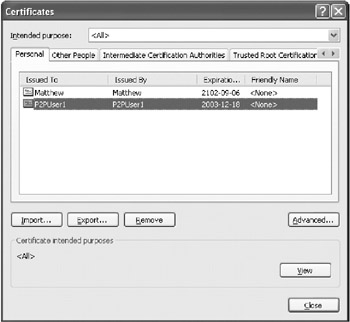
Once a certificate is created, you still have several additional steps to complete. First, run the makecert.exe utility included with the .NET Framework, and find the certificate in the Personal store (see Figure 13-9). You must then perform three additional tasks:
Export this certificate to a .cer file stored on your hard drive (typically in the Intel Peer-to-Peer Accelerator Kit directory).
Import this certificate into the Trusted Root store for the current user.
Import this certificate into the Trusted Root store for the peer you want to communicate with securely.
All of these tasks are described in more detail, along with the basics of client certificates, in a lengthy HTML file called CertificateManagement Education and Help.html, which can be found in the CertificateManagementUI directory. A detailed discussion is beyond the scope of this chapter.
Finally, you need to modify the configuration file to use this new certificate. To configure the certificate for incoming connections, you modify the <ServerCertificate> tag to use the certificate name:
<Module Name="SecureListener" Assembly="...Intel.Peer.Messaging.Services.dll"
 TypeName="Intel.Peer.Security.SecureListener.SecureListenerInitializer"
 Load="true" Essential="true">

  <ListenerPort>8443</ListenerPort>
  <ServerCertificate>
    <Name>P2PUser1</Name>
  </ServerCertificate>

</Module>
You must also configure the certificate in order to use it for outgoing connections. In this case, you need to reference the exported certificate file instead of the certificate name, because the certificate information will be read from the disk, not from the local store. This quirk is related to a limitation in .NET's support for retrieving certificate information.
<Messaging LoggingLevel="0">

  <ListenerPort>8080</ListenerPort>
  <ClientCertificate>C:\MyDir\P2PUser1.cer</ClientCertificate>
  <HttpProxyHost></HttpProxyHost>
  <HttpProxyPort>1</HttpProxyPort>

</Messaging>
Finally, you must restart the peer service using the Computer Management utility in the Control Panel.
Clearly, the configuration steps involved in setting up SSL authentication and encryption are far from minor. If you need a more flexible, dynamic form of authentication and validation, refer instead to the custom examples developed in Chapter 11.
| Note |
With encrypted communication, the peer service performs the encryption and decryption. Thus, an unencrypted message could be sent if an attacker could determine the underlying Remoting address and contact it directly. For that reason, you should not rely on SSL sessions for encryption, unless your computer is behind a firewall that makes port-scanning attacks impossible. |
Free JavaScript Editor
JavaScript Editor