
JavaScript and Ajax Editor,
Validator and Debugger!
1st JavaScript Editor.
| Response data under the microscope |
Once you understand the various ready states that occur during a request, you're ready to look at another important piece of the XMLHttpRequest object -- the responseText property. Remember from the last article that this is the property used to get data from the server. Once a server has finished processing a request, it places any data that is needed to respond to the request back in the responseText of the request. Then, your callback function can use that data, as seen in Listing 1 and Listing 4.
   function updatePage() {
     if (request.readyState == 4) {
       var newTotal = request.responseText;
       var totalSoldEl = document.getElementById("total-sold");
       var netProfitEl = document.getElementById("net-profit");
       replaceText(totalSoldEl, newTotal);

       /* Figure out the new net profit */
       var boardCostEl = document.getElementById("board-cost");
       var boardCost = getText(boardCostEl);
       var manCostEl = document.getElementById("man-cost");
       var manCost = getText(manCostEl);
       var profitPerBoard = boardCost - manCost;
       var netProfit = profitPerBoard * newTotal;

       /* Update the net profit on the sales form */
       netProfit = Math.round(netProfit * 100) / 100;
       replaceText(netProfitEl, netProfit);
     }
Listing 1 is fairly simple; Listing 4 is a little more complicated, but to begin, both check the ready state and then grab the value (or values) in the responseText property.
Viewing the response text during a request
Like the ready state, the value of the responseText property changes throughout the request's life cycle. To see this in action, use code like that shown in Listing 5 to test the response text of a request, as well as its ready state.
   function updatePage() {
     // Output the current ready state
     alert("updatePage() called with ready state of " + request.readyState +
           " and a response text of '" + request.responseText + "'");
     }
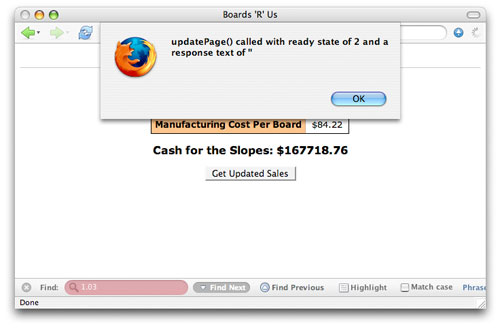
Now open your Web application in a browser and activate your request. To get the most out of this code, use either Firefox or Internet Explorer since those two browsers both report all possible ready states during a request. At a ready state of 2, for example, the responseText property is undefined (see Figure 3); you'd see an error if the JavaScript console was open as well.
At ready state 3 though, the server has placed a value in the responseText property, at least in this example (see Figure 4).

You'll find that your responses in ready state 3 vary from script to script, server to server, and browser to browser. Still, this is remains incredibly helpful in debugging your application.
All of the documentation and specifications insist that it's only when the ready state is 4 that data is safe to use. Trust me, you'll rarely find a case where the data cannot be obtained from the responseText property when the ready state is 3. However, to rely on that in your application is a bad idea -- the one time you write code that depends on complete data at ready state 3 is almost guaranteed to be the time the data is incomplete.
A better idea is to provide some feedback to the user that when the ready state is 3, a response is forthcoming. While using a function like alert() is obviously a bad idea -- using Ajax and then blocking the user with an alert dialog box is pretty counterintuitive -- you could update a field on your form or page as the ready state changes. For example, try to set the width of a progress indicator to 25 percent for a ready state of 1, 50 percent for a ready state of 2, 75 percent for a ready state of 3, and 100 percent (complete) when the ready state is 4.
Of course, as you've seen, this approach is clever but browser-dependent. On Opera, you'll never get those first two ready states and Safari drops the first one (1). For that reason, I'll leave code like this as an exercise rather than include it in this article.
Time to take a look at status codes.
| Home | Ajax tutorials | JavaScript Editor | | Get Advanced JavaScript and Ajax Editor, Validator and Debugger! 1st JavaScript Editor. |